Build stability and strength in your ankles with these expert-approved moves.
Ankles are often an overlooked part of the puzzle when it comes to training, but they’re one of the most common injury areas for athletes. The classic injury is a sprained ankle. That’s when the ligaments that connect one bone to another (in this case, the ones connecting the tibia and fibula to the calcaneus and talus bones) get torn. Depending on severity, these injuries can take quite a while to recover from, and they usually decrease stability at the joint even after the injury is healed. Foot and ankle strengthening exercises can help you prevent these injuries before they happen.
By strengthening the joint with ankle exercises, you can develop bulletproof ankles that not only have ideal stability, but also improved mobility, too. Healthy ankles also have benefits beyond your feet. Ankles have a big effect on your standing posture and walking gait, for example, and weak ankles can create unbalanced stress forces on your knees, hips, and even lumbar spine. Keeping your ankles healthy also helps these other areas of your body.
Anatomy of the Ankle Joint
Anatomically speaking, the ankle refers to the area where the foot meets the lower shin. The protrusions we all refer to as the ankles on each foot (those knobby bumps on either side of our heels) are called the lateral and medial malleolus—a fancy anatomy term to define the bottom ends of our shin bones, the tibia and fibula.
The muscles and connective tissue that surround this joint are integral to the stability of the ankle, and if you want healthy joints, it's essential to keep them strong.
The Soleus Muscle: The soleus is located deep inside the calf, close to the bottom half of the lower legs. It acts as a huge stabilizer to the lower leg (since it’s a deeper muscle that’s basically always working). It’s a crucial, and often ignored, element of lower leg development.
The Tibialis Anterior Muscle: When talking about ankle mobility and strength, people often think about ways to make the foot plantar flex (pointing the toes down and away from the leg), but rarely do they think about the ability to dorsiflex (bringing the toes upward, closer to the shin). The tibialis anterior is located on the front side of the shin, and it’s responsible for pulling the toes up. It’s important to strengthen this movement to promote full range of motion at the ankle joint, and it’s also crucial for the health of other joints, especially the knees. Often when someone has knee problems and a history of knee pain, they’re lacking knee-over-toe mobility and strength caused by poor dorsiflexion at the ankle.
The Plantar Fascia: Although not a muscle, the plantar fascia are just as important for ankle joint strength and health as the muscles above. The fascia is largely responsible for the resting position of the foot, which can be a key indicator of what parts of the body receive added stress or are more susceptible to injury. The ankle is one of the first joints to be subject to the consequences of a misaligned foot resting position.
The Gastrocnemius Muscle: General calf strength will be useful in getting stronger ankles, since both heads of the gastrocnemius (a.k.a. the calf muscle) share a common tendon: the Achilles. Their strength and tissue quality will influence overall ankle strength and stability.
The Top 5 Ankle Strengthening Exercises
It’s important to address ankle mobility, stability, and strength when exercising the joint. Each of the ankle strengthening exercises below brings something unique to the table to aid in creating healthy ankles, and together they work all sides of the joint.

1. Heel Walk
This movement will create a good burn to start your lower body workout. It helps improve mobility at the ankle through strengthening the tibialis anterior, the prime muscle involved in dorsiflexion.
How to Do It:
To do this move, simply walk on your heels while keeping your toes off the ground. Elevate the forefoot as high up as possible. Walk forward with small, short strides for 30 to 60 seconds at a time. Then perform the same movement, but this time keep the toes facing inward as well as upward. Finally, do the same walk once again, but keep the toes facing outward and upward. Performing one set of each foot position makes a great warmup.
Nattapong Wongloungud / EyeEm / Getty Images
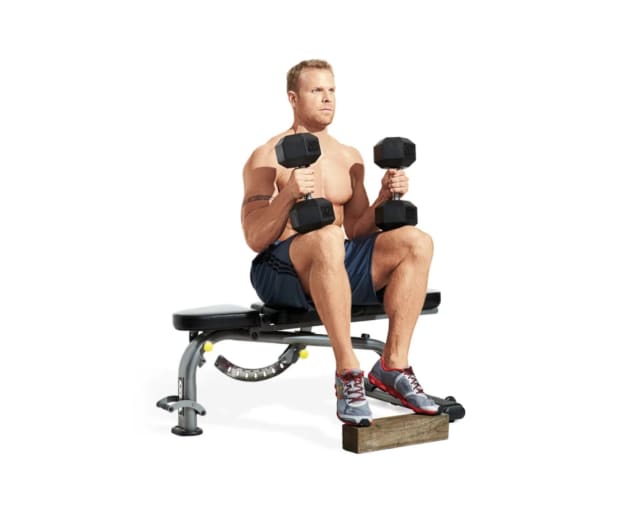
2. Seated Calf Raise
The seated calf raise machine differs from doing standing calf raises due to the fact that the knee is already in flexion to begin; this takes the gastrocnemius muscles out of the picture to keep the focus on the soleus. These muscles are geared toward long endurance work (they’re always working to help us walk and stay standing). For that reason, the soleus muscles respond well to high-rep sets. The ankles will also benefit, as stronger soleus muscles make the joint more durable and stable.
If you don’t have a seated calf raise machine, this move can be done in a seated position with a pair of heavy dumbbells or other weights placed securely on the knees. Ideally, you’ll want to rest the balls of your feet on a block or step so your heels can dip farther down, but it’s OK if you perform this move with your feet flat on the ground, too.
How to Do It:
Sit down and place the weights on your knees. Your knees should be bent 90 degrees and your toes turned out about 15 degrees. Allow your heels to drift toward the floor until you feel a stretch in your calves. Then drive the balls of your feet downward and raise your heels as high as possible. That’s one rep. Focus on 3 to 4 sets of 20 to 30 reps.

3. Jumping Rope
The problem most people run into when it comes to making the ankles more durable? Doing too much too soon. Jumping rope allows you to strengthen the ankles with lower-level impact forces.
How to Do It:
Try finishing a workout with 60 seconds on, 60 seconds off jump rope intervals for a total of 6 to 8 intervals. As a bonus, you’ll get great calf training as well.
Cavan Images / Getty Images

4. Lacrosse Ball Rolling
Addressing the tissue quality of the bottom of the foot can work wonders for improving ankle mobility and reducing chronic pain in and around the feet. This move focuses on the plantar fascia at the bottom of the foot.
How to Do It:
Sit on a sturdy chair and place a lacrosse ball under your bare foot. You can add a bit more pressure under the foot by leaning on the thigh or knee of the working leg. Press downward on the ball with your foot and roll it back and forth from the heel to the base of the toes. Try to cover as much surface area across the bottom of the foot as possible, which may require rolling the ball in different directions, not just forward and backward. Focus on 3 minutes of rolling per foot. Do this move before your workout begins, or after it’s over.
Ben Haslam / Getty Images
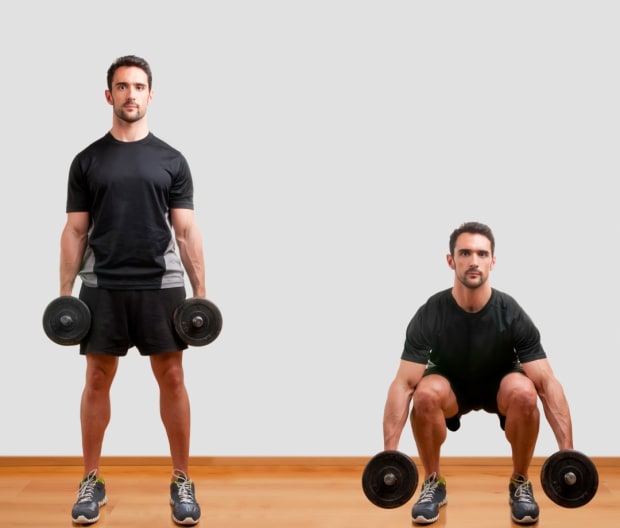
5. Heels-elevated Dumbbell Squat
The heels-elevated dumbbell squat isn’t a fix for ankle immobility in itself, but it’s a great way to access ankle range of motion while the knee is fully flexed, and that’s significant. Most people who have ankle immobility never get the chance to experience a full, deep squat due to the demands it would place on their center of gravity. As a result, they can’t bear load through deep ankle dorsiflexion or knee flexion ranges. Elevating the heels places the ankles in a position of flexion to start the lift, while the body is standing tall, allowing the ankles to have more room to dorsiflex as the butt travels downward. In short, everyone will get a deeper squat by placing their feet on a slant board. Using a narrow stance will amplify the benefits to ankle mobility also. Plus, the quads will get hit hard.
How to Do It:
Grab two dumbbells, one in each hand, and stand squarely on a slant board. Point the toes outward slightly wider than the heels. Remember, since your heels are already elevated higher than your toes, there’s no need to lift them off the board as you squat. Keep pressure through the full foot. Hold the dumbbells by your sides like briefcases and aim to stay as vertical as possible as you descend to full depth. To keep your vertical orientation, imagine placing the weights down beside your ankles. Focus on sets of 10 to 15 reps.
(Note: Image above does not show a heels-elevated squat.)
from Men's Journal https://ift.tt/TMcLO6x


0 comments